Cables and Hardware for Conversion From De La Rue Dual to Fujitsu Dual Bill Dispenser Auto Sentry flex
Tools Needed
Prior to performing this procedure, you will need to have the following tools:
- 3/8” nut driver or ratchet
- 11/32” nut driver or ratchet
- Phillips screwdriver
Parts Included
Completion Time
We estimate that it will take 30 minutes to perform this procedure. Keep all hardware organized as
you work.
WARNING: Please have a certified electrician check voltages on the power supply before
installing new components. The voltage should be 24 volts.
Powering Down the Auto Sentry flex
WARNING: Failure to turn off the Auto Sentry increases the risk of serious bodily injury or death;
and also, may cause the credit card reader to go into a tamper state and if that happens, the credit card reader will have to be replaced.
- On the site server desktop, click on the VNC icon for the Auto Sentry flex.
- On the menu bar, click the Windows Flag icon.
- Click the Shutdown button.
- Wait until the Auto Sentry flex display goes to a white screen.
- With the hex key, open the rear doors of the Auto Sentry flex.
- Turn off the power switch inside the Auto Sentry head.
- Turn off both breakers inside the Auto Sentry head by pressing the blue buttons on the breakers until they click out.
- Turn off the breaker inside the Auto Sentry base by pressing the blue button on the breaker until it clicks out.
- Shut off the electricity to the Auto Sentry by turning off the Auto Sentry breaker inside the ICS power distribution box.
Convert the De La Rue to the Genmega Bill Dispenser
WARNING: See Powering Down the Auto Sentry above.
- In the base of the Auto Sentry, disconnect the main bill dispenser power and data cables from the power and data pigtail cables attached to the bill dispenser.
NOTE: If replacing a De La Rue bill dispenser, remove the screw, and clamp holding the main power and
data cables to the upper left corner of the back bill dispenser support wall. - Remove the screws and nuts holding the bill dispenser to the shelf, and then remove the bill
dispenser, - Remove the (6) bolts, washers, and lock nuts holding the walls to the bill dispenser drawer.
Remove the walls, and shelf attached. Leave the bill dispenser drawer in the Auto Sentry.
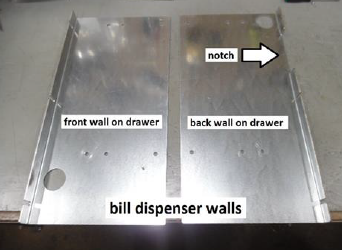
- Mount the new walls on the drawer with the hardware from the old walls (3) ea. 1/4" bolt, 5/9" flat washer, and lock washer.
- On the side of the drawer with the black handle, mount the front wall (without the notch) to the inner set of holes in the drawer.
- Align the edge of the washers with the outer edge of the wall.
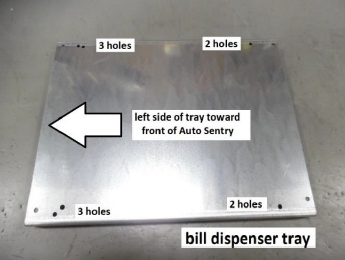
- Orient the bill dispenser drawer in front of you with the black handle toward you. Orient the bill dispenser tray so the end with the 3 holes in each corner is to the left. Lower the shelf between the walls and attach it to the bottom pairs of holes on the inside and outside walls.
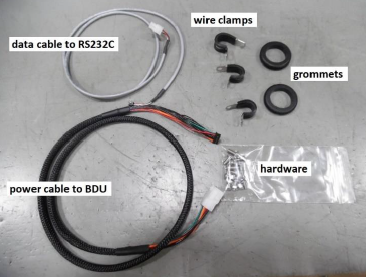
- Attach a GROMMET1-3/4 to each of the large holes in the walls. Route the wires for the Fujitsu bill dispenser through these 2 holes as shown in the pictures below. The ends with the large white connectors must exit the hole in the back wall by the notch. The ends with the small black connectors must exit the hole in the front wall.
- Data cable
- Power cable
- Use a medium wire clamp and attach these wires to the screw stud on the upper right corner of the front wall with a #8 washer nut. Allow enough cable length to reach the bill dispenser.
- Use a medium clamp to attach the wires to the right side shelf screw on the bottom right corner of the back wall.
- Install the bill dispenser drawer back into the Auto Sentry. Attach the data cable and power cable from inside the Auto Sentry to the data and power cables on the back wall of the drawer. Then attach the data and power cables from inside the Auto Sentry to the upper right corner of the back wall using a large wire clamp, #10--32X1/2" screws and #10 washer nut.
- Attach the bill dispenser to the shelf using the brackets attached to the front bottom corners of the bill dispenser. Use 2 ea. #10- 32 x 3/8" washer nuts provided.
- Connect the power and data cables on the front wall to the power(BDU) and data(RS232C) connectors on the bill dispenser.
Powering Up the Auto Sentry
- Reconnect the power to the ICS power distribution box by turning on the Auto Sentry
breaker inside the ICS power distribution box. - Turn the breakers on inside the Auto Sentry Flex by pressing the blue buttons on the
breakers until they click in. If you have the orange breaker, pull up the handle on the orange
breaker to turn it on. - Inside the Auto Sentry, turn on the power switch to boot the system.
- Close the Auto Sentry base door.
- Test the bill dispenser.
Please contact ICS Technical Support if any assistance is needed:
800-246-3469
INSTR0062
Comments
0 comments
Article is closed for comments.