Replacing the First Data ID Tech Card Reader in an Auto Sentry flex
Tools Needed:
- 3/8”, 11/32”, and 5/16” nut driver or ratchet
Time to Complete
We estimate that it will take 1 hour to perform this procedure, time will vary based on skill set.
NOTE: Keep all hardware organized as you work.
Please read the entire procedure before starting.
WARNINGS:
- Power down Auto Sentry before swapping out the bill acceptor.
- Never connect or disconnect the power or COM cable to the bill acceptor while the Auto Sentry in on.
- DO NOT UNPLUG “HOT” power cable as this will damage the bill dispenser & the WARRANTY WILL BE VOIDED.
Parts Included
Instructions to Power Down the Auto Sentry flex
WARNING: Failure to turn off the Auto Sentry increases the risk of serious bodily injury or death; and also, causes the credit card reader to go into a tamper state and it will have to be replaced.
- On the site server desktop, click on the VNC icon for the Auto Sentry flex.
- On the menu bar, click the Windows flag icon.
- Click the Shutdown button.
- Wait until the Auto Sentry flex display goes to a white screen.
- Using the hex key, open the rear doors of the Auto Sentry flex.
- Turn off the power switch inside the Auto Sentry.
- Turn off both breakers inside the Auto Sentry by pressing the blue buttons on the breakers until they click out.
- Shut off the electricity to the Auto Sentry by turning off the Auto Sentry breaker inside the ICS power distribution box.
BEZEL MOUNT CARD READER
- Remove the power and data cables from the existing card reader and lay aside out of the way. It is not necessary to remove the cables.
- Have a second person hold the black bezel on the front of the Auto Sentry as you remove the card reader by removing the (4) nuts holding it to the inside of the Auto Sentry using an 11/32” nut driver or ratchet.
- One of the nuts will be holding a ground wire to the card reader. Lay that aside also.
FLUSH MOUNT CARD READER
- Remove the power and data cables from the existing card reader and lay aside out of the way. It is not necessary to remove the cables.
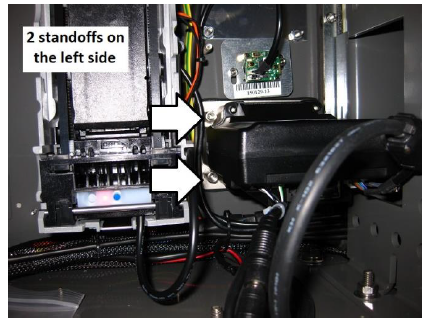
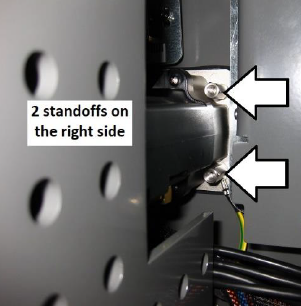
Remove the card reader by removing the 4 nuts holding it to the inside of the Auto Sentry using an 3/8” nut driver or ratchet. Instead of nuts, the card reader may be attached with standoffs. Use a 5/16” nut driver or ratchet to remove the 4 standoffs. One of the nuts will be holding a ground wire
to the card reader. Lay that aside also.
ATTACHING THE NEW CARD READER
The procedure for attaching the card reader with the front bezel is shown below. The procedure for the card reader without the bezel is similar and the reverse of removing it described above.
- Have a second person stand in front of the Auto Sentry and hold the new card reader bezel in place in the bracket as you attach the new card reader to the inside of the Auto Sentry. Use the same hardware to secure in place. Attach the supplied yellow/green ground wire to one of the bottom (2) nuts.
- Attach the (2) connectors on the other end of the contactless card reader cable to the back of the new card reader.
- Attach the white connector on one end of the USB cable to the back of the new card reader.
NOTE: The green wire is toward the middle of the card reader as shown below.
- Organize all the new cables neatly inside the Auto Sentry and secure them out-of-the-way with wire ties.
- The picture below is provided to give a better view of the connections to the back of the new card reader.
Powering On the Auto Sentry flex
- Reconnect the power to the ICS power distribution box by turning on the Auto Sentry breaker inside the ICS power distribution box.
- Turn the breakers on inside the Auto Sentry flex by pressing the blue buttons on the breakers until they click in.
- Inside the Auto Sentry flex, turn on the power switch to boot the system.
Please contact ICS Technical Support if any assistance is needed:
800-246-3469
File Name: INSTR0121
Comments
0 comments
Please sign in to leave a comment.