F400 to Genmega Bill Dispenser Conversion
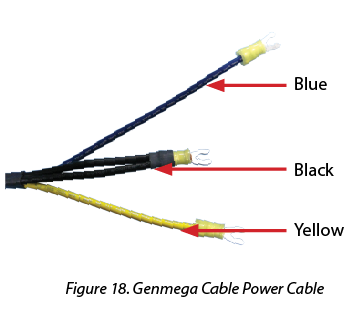
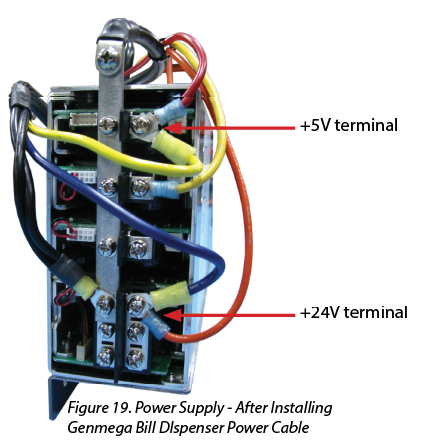
WARNING: If the F400 bill dispenser you are removing has a direct power cable to the power supply, use the power pigtail cable AS3CBL29 and power harness cable AS3CBL03D. YOU MUST MAKE THE CORRECT WIRING CONNECTIONS AT THE POWER SUPPLY AS ILLUSTRATED.
Completion Time
We estimate that it will take one hour to perform this procedure. Keep all hardware organized
as you work.
Convert the F400 to the Genmega Bill Dispenser
WARNING: Shut down the Auto Sentry and turn off the power switch.
- Open the base of the Auto Sentry.
- Disconnect the main bill dispenser power and data cables from the power and data pigtail cables attached to the bill dispenser.
NOTE: If replacing a De La Rue bill dispenser, remove the screw and clamp holding the main power and data cables to the upper left corner of the back bill dispenser support wall.
- Remove the screws and nuts holding the bill dispenser to the shelf, and then remove the bill dispenser.
- Remove the (6) bolts, washers, and lock nuts holding the walls to the bill dispenser drawer. Remove the walls, and shelf attached. Leave the bill dispenser drawer in the Auto Sentry.
- Remove the prior style bill cup from the front of the Auto Sentry.
- Locate and install the new bill cup using the same (8) nylon lock nuts from the original bill cup. See Figure 4.
- Locate and attach the new side walls to the drawer: The wall with the cut-out goes to the
back side of the drawer in the same cut-out in the drawer. Attach the side walls with (3)
¼”-20x3/4” bolts, lock washers, and fender washers. Push the wall back against the fender
washers and tighten in place. Attach the front wall to the inner row of screws on the front
of the drawer using (3) 1/4”-20x3/4” bolts, flat washers, and lock washers. Leave the bolts
loose until the shelf is attached in the next step.
- Attach the shelf to the walls using (4) ¼”-20x1/2” screws. The corners with the 3 holes go
toward the front of the Auto Sentry, the corners with the 2 holes go toward the back. When
the shelf is tight, tighten the (3) bolts for the front wall.
- Attach the 2 rubber grommets to the round opening in the walls.
- Locate the 2 new cables with dark fiber sheath. Connect the 3-pin connector on power cable
to the 3-pin connector on the other cable. The long black wire is not used. - Route the 10-pin connector end of the cable thru the rubber grommet in the inner bill
dispenser wall, below the shelf, and thru the grommet in the outer bill dispenser wall. Feed the
smaller of the 2 connectors on the data cable through the grommet on the front wall, between
the drawer and shelf and through the grommet in the back wall. Behind the back wall, attach
the data cable to the data harness.
- Find the clamp that holds the main bill dispenser power cable and data cables to the old walls.
Remove the ¼” screw holding the shelf to the wall at the rear left corner of the shelf and attach
the clamp here with the 2 new wires. The connectors on both wires should be located above the
clamp, not below.
- Remove the Genmega bill dispenser from the box. Remove the cassettes. Place the
Genmega on the shelf with the cassette openings toward the front of the Auto Sentry. Align
the screw holes on the front edge of the shelf with the screw holes in the bottom front edge
of the Genmega. The front of the Genmega (toward the front of the Auto Sentry) is to be
positioned so that it is in line with the front edge of the shelf. Attach the Genmega to the
shelf with (4) #8-32x3/8” screws and keps nuts, (2) on the front side of the shelf and (2 on the
back side).
- Run the cables from the grommet on the front wall up the side of the Genmega and attach
to the main circuit board on the Genmega as shown in the picture. Secure the cable about
halfway up the side of the Genmega to the main harness on the Genmega. Figure 15.
- Remove the keys from the cassettes, open the cassettes, and insert bills. Insert the cassettes into the Genmega. Be sure you have installed the update to the WashConnect software with the updated Device Interface Application for the operation of the Genmega using a wire tie. Feed any extra cable thru the grommet and between the shelf and the drawer.
- Please pack the Fujitsu bill dispenser in the same boxes that were set aside when unpacking the Genmega bill dispenser.
- Route the spade connector ends of power cable upward to the head of the Auto Sentry.
- Open the top left door of the Auto Sentry flex, and locate the power supply. Continue to
route the cable toward the power supply. - 19. Using the #2 Phillips screw driver, remove the old bill dispenser power harness from the
power supply. - Connect the new Genmega bill dispenser power harness to the power supply as follows:
- Attach the yellow wire to the +5V terminal.
- Attach the blue wire to the +24V terminal.
Attach the black cable to the ground terminal bar.
Instructions to Power the Auto Sentry
- Reconnect the power to the ICS power distribution box by turning on the Auto Sentry breaker inside the ICS® power distribution box.
- Turn the breakers on inside the Auto Sentry Flex by pressing the blue buttons on the breakers until they click in. If you have the orange breaker, pull up the handle on the orange breaker to turn it on.
- Inside the Auto Sentry, turn on the power switch to boot the system.
Please contact ICS Technical Support if any assistance is needed:
800-246-3469
File Name: INSTR0162
Comments
0 comments
Please sign in to leave a comment.